Run the show
This page is a procedure. It is written to be read fast, possibly while something is going wrong.
Before any of it: you should have run the show once in Standby. The checklist is at the foot of Rehearse.
Go live
- Press GO LIVE: the blue icon button on the left of the transport bar, under the ON AIR / NEXT boxes. In Standby it carries an icon, not the words GO LIVE.
- The button turns amber and reads
CONFIRM? (3), counting down. - Press it again inside those three seconds.
Miss the window and it disarms itself and goes back to normal. Nothing happened.
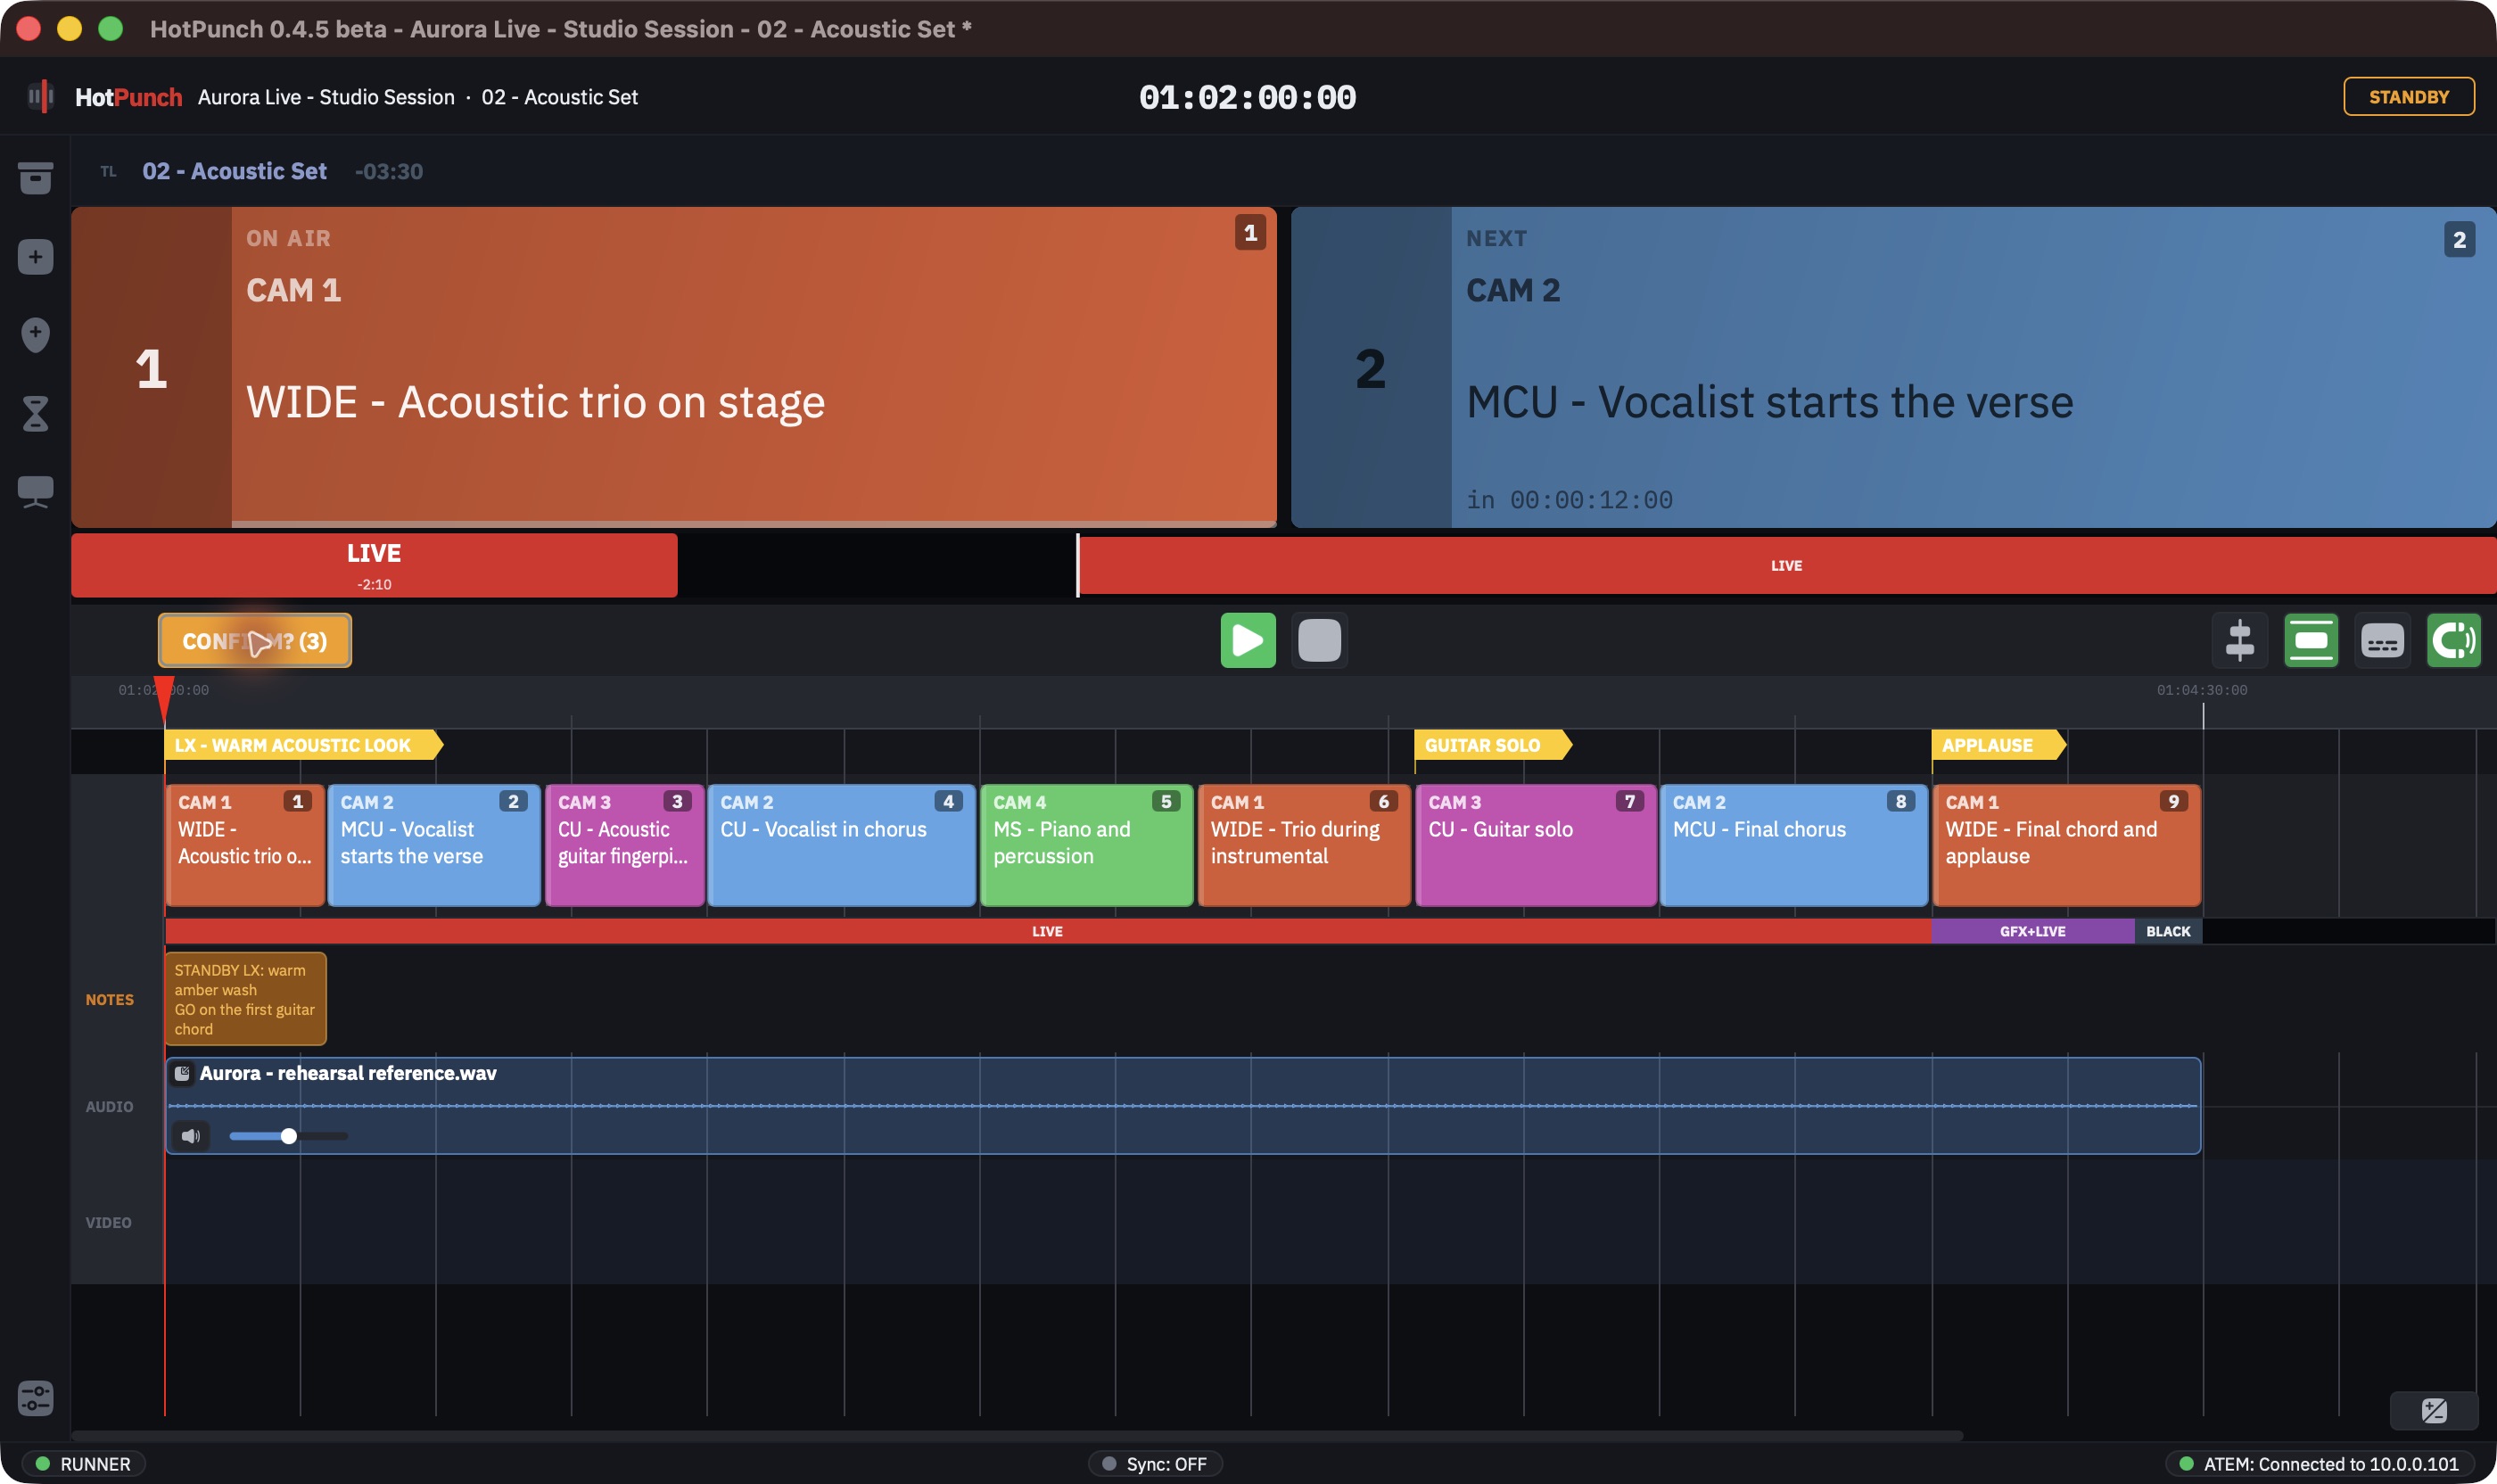
The moment you confirm:
- Dry run is switched off. Commands now reach the mixer.
- The current cue is punched. HotPunch does not wait for the next boundary: it asserts the cue under the playhead immediately, with a CUT, and loads the following cue into preview. Going live mid-timeline changes program now. Know what is under the playhead before you press it the second time.
- Four windows are closed out from under you, each with a toast: Settings, Cue Edit, Timeline properties, Show Manager. They were editing surfaces that would otherwise have survived into the on-air state.
- The state pill turns green and reads
LIVE. Amber is Standby. If the pill is amber, you are not on air.
If GO LIVE will not arm
The button is greyed out. Hover it — the tooltip is the reason. There are four:
| Tooltip | Fix |
|---|---|
Loading audio - please wait... |
Reference media is still decoding. Wait; the button enables itself |
Close the ISO Review window before going Live |
Close it. See ISO recording |
| A licence message | See Licensing |
| (no button at all) | You are Offline. Connect a mixer first — Connect a mixer |
The GO LIVE button does not exist in Offline. It appears in Standby.
If GO LIVE arms, you confirm, and nothing happens
The transition itself can be refused after the confirm. You get an alert titled Cannot Go Live naming the cause:
No show selected— load a show first. See Building the show.<protocol> not connected— the engine dropped. See Connect a mixer.no protocol engine configured— no protocol has been chosen.
The Show Pass case
On a Show Pass licence, the first GO LIVE is rejected on purpose. Instead of going live, HotPunch opens a dialog: Going LIVE will START your Show Pass — its validity window begins at that moment and cannot be paused.
Press Arm Show Pass, then press GO LIVE again — arm and confirm, as before.
In the room this reads as a broken button: you did the double press, you got a dialog, and you are still in Standby. You are not. The pass is armed and the next GO LIVE will work. This guard also covers MIDI and OSC, so a remote GO on an unstarted pass is refused the same way. See Licensing.
While you are on air
Editing is refused in Live and in Break. Rejected edits raise a toast rather than
failing silently: Editing locked while Live - switch to Standby to edit.
The boundary is not a wall around the whole application. Three things remain possible on air by decision, and one of them can pause your show. They are listed in The model — read them once, before your first show, not during it.
Settings cannot be opened in Live or Break. Attempting it raises Settings Blocked.
That includes the log tab: on air, the log is not reachable. If you want a record of the
show, file logging must have been switched on in Standby.
The Show Manager cannot be opened on air either, for the same reason: loading a show would replace the timeline that is driving the mixer.
Break
Break is manual override without leaving the show. The timeline keeps running and keeps counting; it just stops driving the mixer. The mixer connection stays up — Break is not a disconnect. You are the one switching.
Getting into Break
Deliberately: press BREAK in the transport bar, or press Escape. Both are single actions — there is no arm-to-confirm on Break, because it is the safe direction.
Warning
Escape is not unconditional. If a flyout panel is open it closes the panel instead; if a pinned FAILOVER banner is up it dismisses that instead. Only the next Escape reaches Break. Under pressure, use the BREAK button — it has one meaning.
Automatically, and there are two ways:
A mismatch on program. If somebody switches on the mixer panel and program stops matching what HotPunch expects, HotPunch stands down rather than fighting the operator. It requires two consecutive mismatched polls (about 0.4 s of sustained disagreement) and fires once per Live session.
This does not work on most protocols
Mismatch detection needs the mixer to report its real state back. Only ATEM does. On Roland, Panasonic, FOR-A and Datavideo the engine reports back the last command HotPunch itself sent, so it can never disagree with itself. On Companion (OSC) and Kahuna there is no report at all. On those protocols a hand switch on the desk is invisible and auto-breakaway will never fire, whatever the toggle says. See declared maturity.
Auto-breakaway is also disabled outright when dual M/E is on, and its toggle disappears from Settings. See Dual M/E.
The mixer connection drops. This is the one you will actually meet. Losing the switcher
in Live forces Break, with the toast
Mixer connection lost - BREAK (manual control). HotPunch keeps retrying underneath —
after 0.5 s, then 5 s, then every 30 s — while you drive by hand. A second drop while
already in Break keeps you in Break and says
Mixer connection lost again - still in BREAK; it does not throw you offline mid-show.
When the connection comes back on air, HotPunch clears its stale expectations and re-asserts the current cue, so it does not immediately break away again on a state it can no longer vouch for.
Getting out of Break
Press BREAK again (it is red while you are in Break), or press Escape.
Warning
Leaving Break re-runs every GO LIVE precondition. If the mixer connection is what put you in Break, you cannot leave Break until it is back. The button will refuse and tell you which precondition failed. This is correct — resuming automation onto a switcher that is not there would be worse — but it surprises people. Keep driving manually.
Returning to Live does not snap program back to the timeline. HotPunch skips the
realignment once, deliberately, so your manual state survives the moment of handover;
automation picks up at the next cue. If that cue is less than two seconds away you get a
warning toast telling you exactly how long: Resuming live - next cue in 1.4s.
Dual M/E
With dual M/E the single BREAK button becomes three: BRK ALL, BRK 1 and
BRK 2. The per-bus buttons let one M/E run on automation while you drive the other
by hand; an active one turns red and reads BRK 1 ON. All three are visible only on
air. See Dual M/E.
Ending the show
END LIVE is also arm-to-confirm. Press GO LIVE — now green — once to arm, again inside three seconds to confirm. This is the same button and the same gesture in both directions, and it exists so a stray click mid-show cannot quietly end your automation.
You can end from Live or from Break; both land in Standby. Dry run comes back on, editing unlocks, per-M/E break flags are cleared, and Settings opens again.
Ending Live is the only way back to editing. There is no path from Live or Break straight to Offline.
The output display
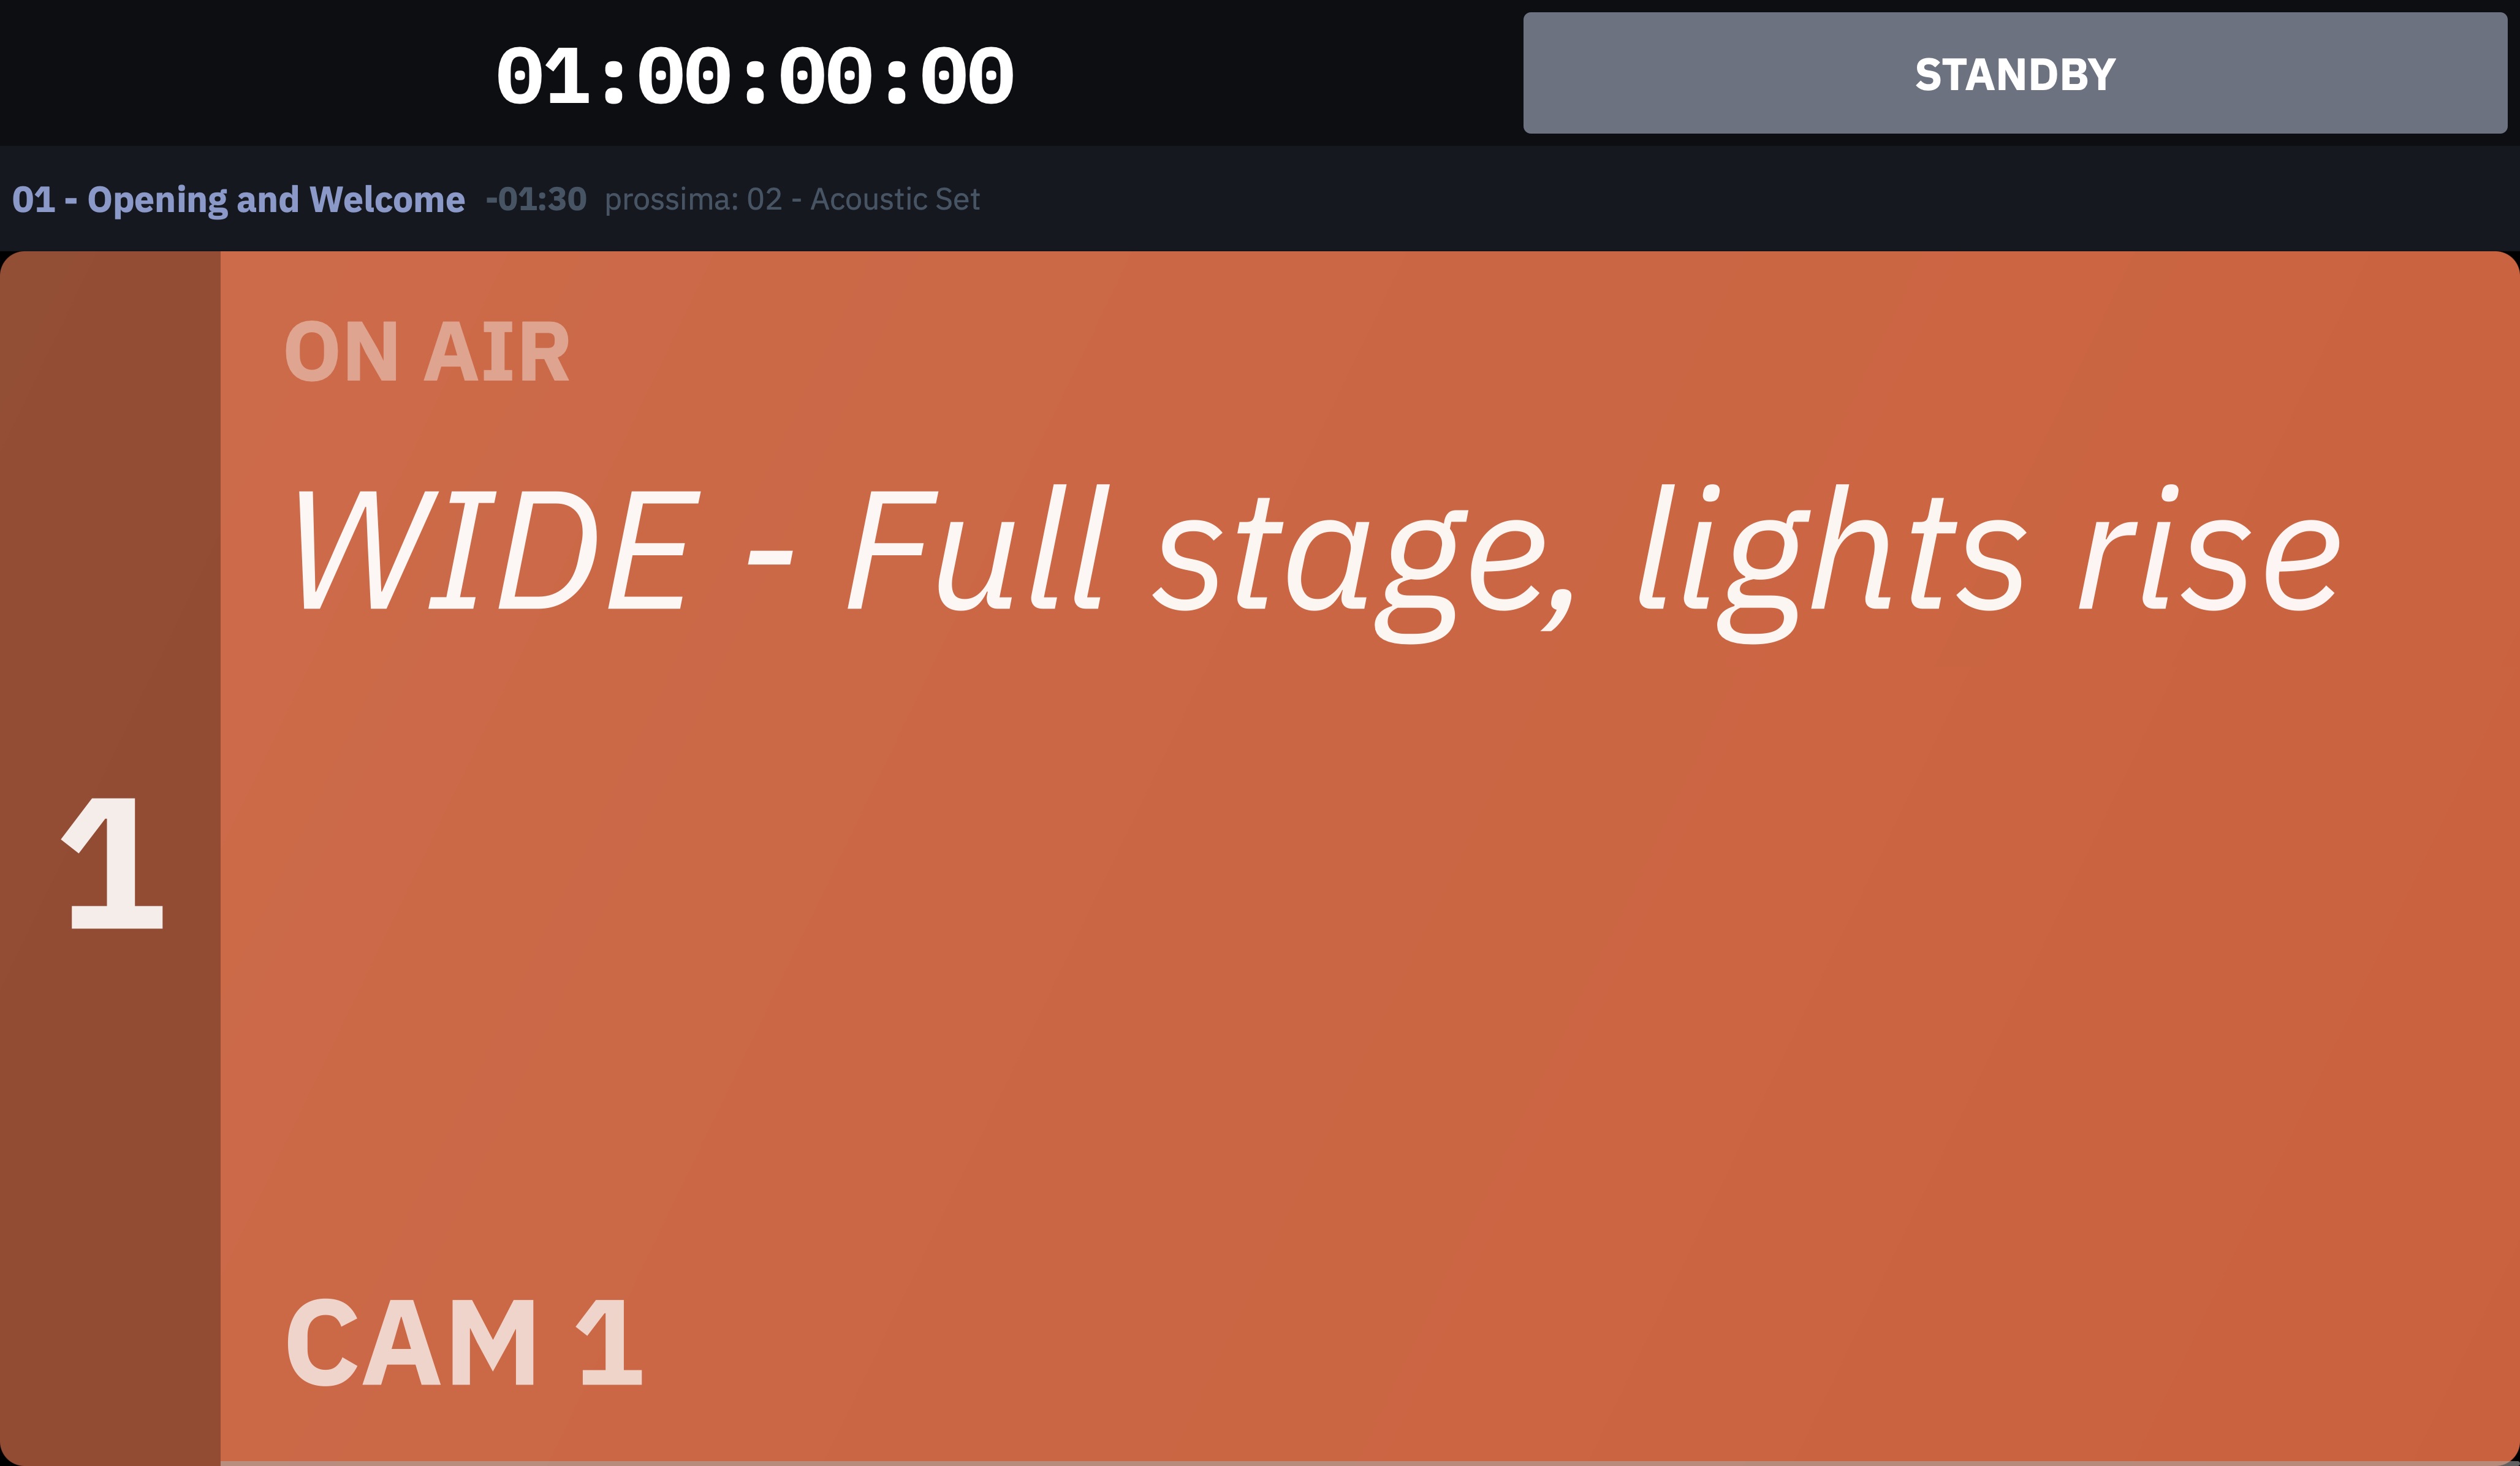
A separate full-screen window for a reference monitor, or to be fed into a multiview or keyed over program.
Open it from the Monitors flyout in the icon rail — the button reads
Enable output — or with Cmd+Shift+F, or View > Output Display. Cmd+Shift+F also
closes it from inside the window itself, which matters because the window is borderless and
always on top.
Configure it in that same Monitors flyout. There is no Output Monitor tab in Settings — these controls live in the flyout, next to the button that opens the window.
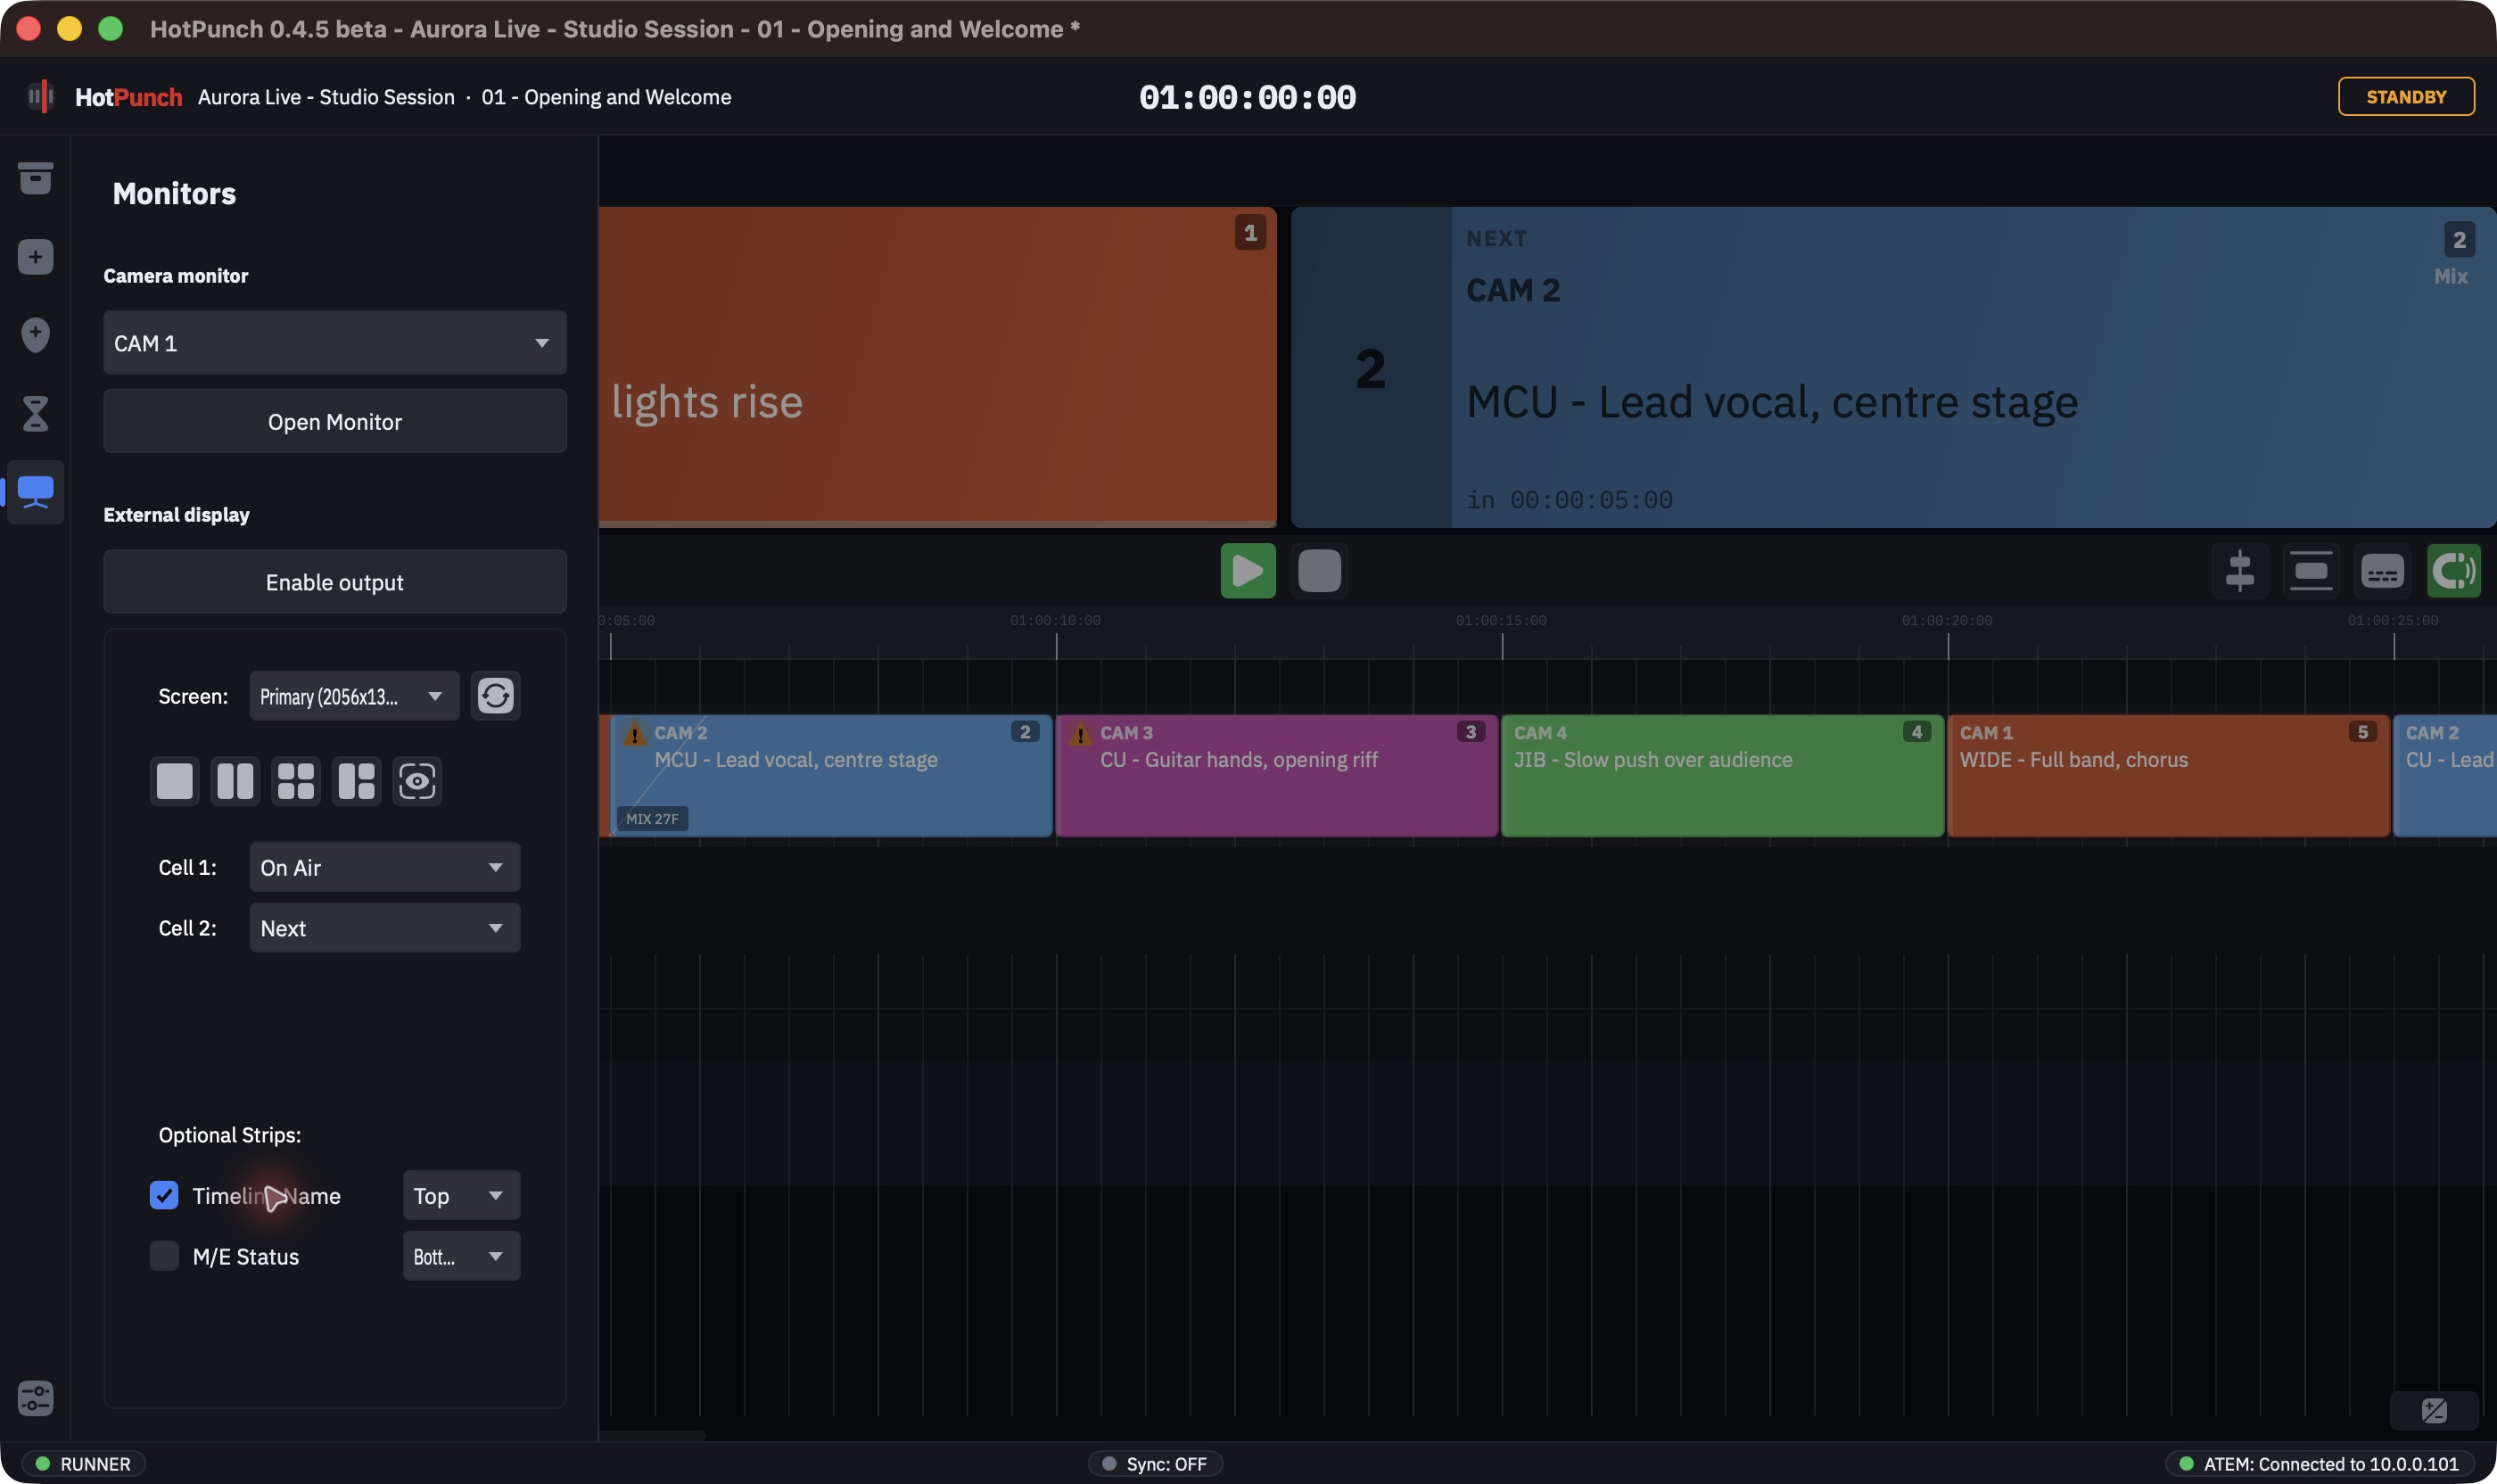
Screen picks the display; the round-arrow icon button beside it (tooltip Refresh list of connected screens) picks up a monitor plugged in since launch. If the configured screen is gone, HotPunch falls back to the primary one rather than opening off-screen.
Warning
Unplug the monitor while the output display is open and HotPunch closes the window,
with the toast External monitor lost - output display closed. It does this on purpose:
a borderless always-on-top window migrating onto the operator screen would cover the
controls you need to close it.
Grid layout is one of five icon buttons in a row; hover for the tooltip. In order: 1x1 (Single widget full screen), 2 col (Two widgets side by side, the default), 2x2 (Four widgets in a 2x2 grid), Big+2 (One large widget left, two smaller stacked right) and Overlay (Keyer overlay). The number of configurable cells follows the layout — one for 1x1, two for 2 col, three for Big+2, four for 2x2 — and the unused cell pickers disappear.
Each cell takes one of: On Air, Next, Cur Note, Next Note, Empty. Defaults are On Air, Next, Cur Note, Next Note in that order. The On Air and Next cells show the source name and its shot description; Cur Note and Next Note read the notes track, not the cue descriptions — the difference is explained in Building the show. With dual M/E on, two more appear: M/E 2 On Air and M/E 2 Next.
Two optional strips, both off by default, each independently placed top or bottom:
- Timeline Name, which also carries an end-of-timeline countdown as
-MM:SS, turning amber in the last thirty seconds, followed by the name of the next timeline in the show when there is one. - M/E Status, showing the current status block and what is coming.
Overlay is the odd one out: floating badges on pure black, meant to be luma-keyed over program on a downstream keyer when you have no spare monitor. It has no cells and no strips — those controls hide themselves. With dual M/E it gains an Overlay M/E picker for which bus the badges follow.
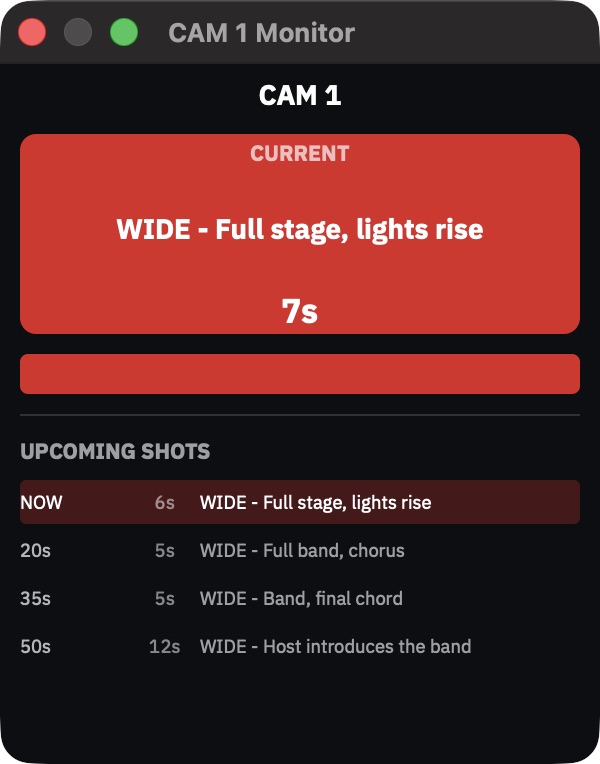
Camera monitor. The top of the Monitors flyout has its own section: pick a camera in the Camera monitor combo and press Open Monitor. The window that opens is that one camera's shot list: its current (or next) shot with a countdown and a draining progress bar, then UPCOMING SHOTS with the time until each, its duration and its description.
What to watch in the main window
The ON AIR / NEXT boxes sit below the transport bar: what is on program, what is next, the transition type, the countdown to it, and both shot descriptions.
Two toggles beside them decide what else is shown: the note boxes, and the M/E status band. Both live in the transport bar — not next to the output button — and both are icon-only, so the tooltip is the only label they have. The status one is the same switch as View > M/E Status Track: it turns the status track on or off for the active timeline, and the band in this window follows it. Both keep working on air.
The status bar names the protocol and the host it is connected to. Click that segment to jump to Settings — in Standby, at least.
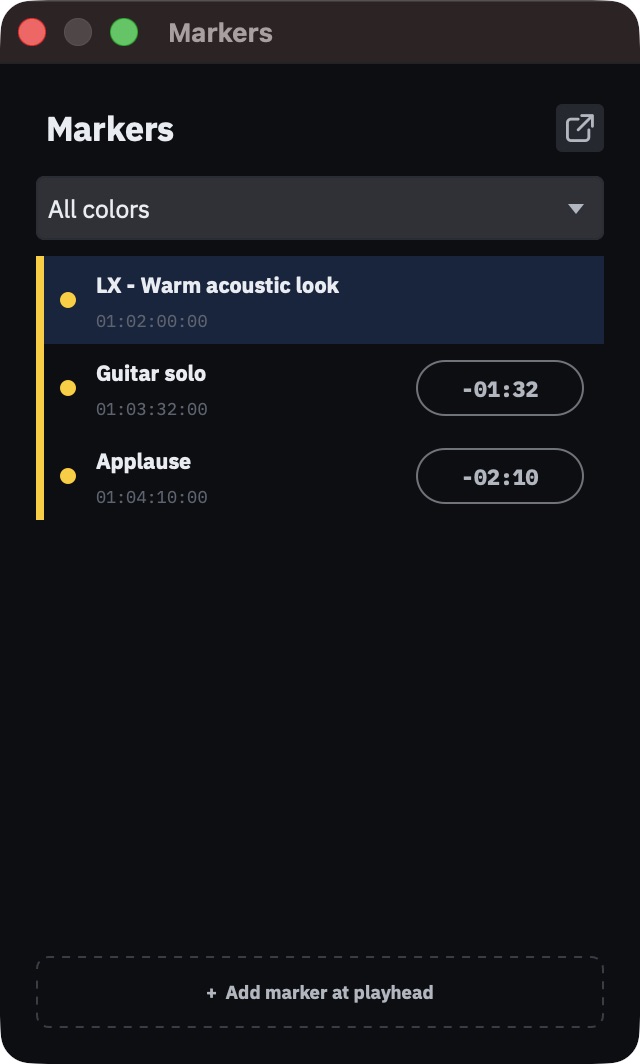
For markers, open the Markers Window from the Window menu, or with the pop-out button at the top of the Markers flyout in the icon rail. It lists the markers of the active timeline with their timecode and a countdown to each, with a colour filter and an Add marker at playhead button.
Remote control
GO LIVE, END LIVE and Break can all be driven from MIDI or from OSC, and the arming rules are not the same as the button's. A MIDI ON AIR goes live on a single message, by decision. So does an OSC end-live. An OSC go-live routes through the same arm-to-confirm as the button and needs two.
Nothing bypasses the preconditions: everything, including the Show Pass guard, is checked on every path. The details are in Remote control.
If something is not behaving as described here, Troubleshooting is indexed by symptom rather than by subsystem.